Follow Me On Social Media!
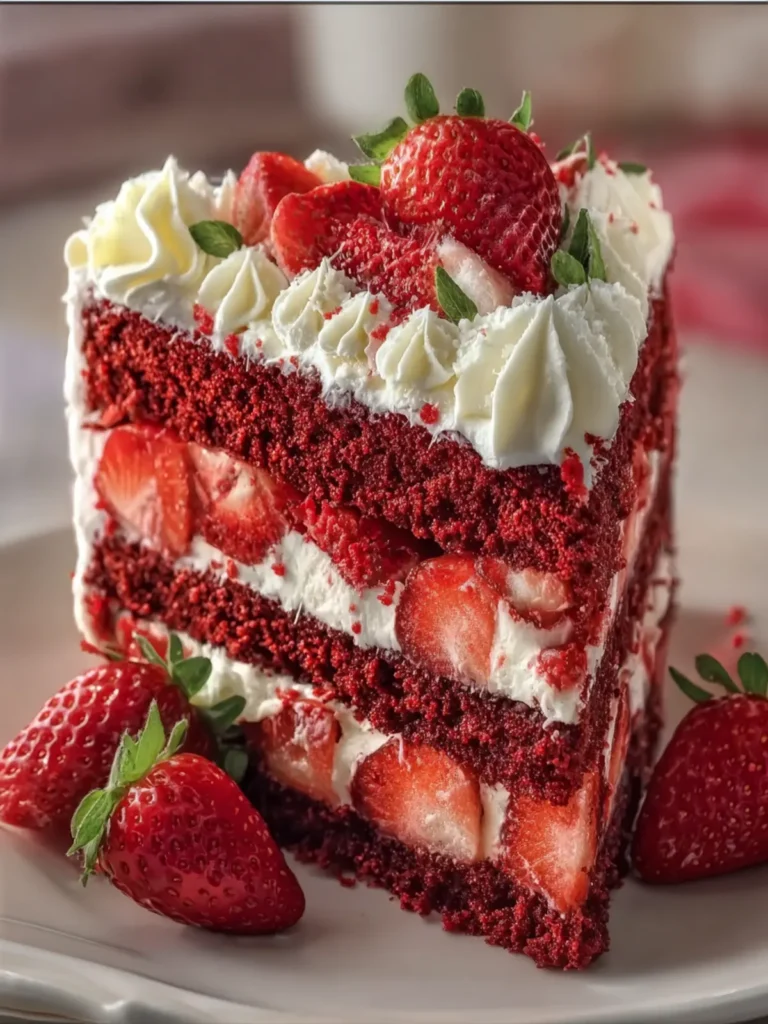
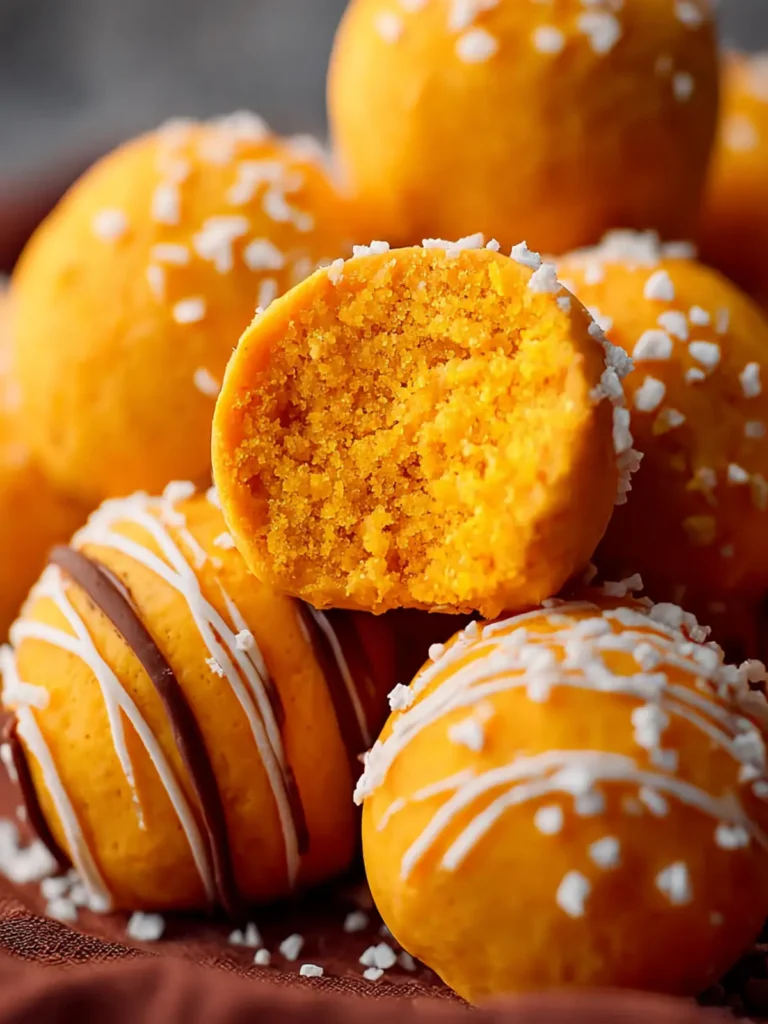
Red Velvet Snowball Cookies: Irresistibly Melt-in-Your-Mouth Delight
Introduction to Red Velvet Snowball Cookies
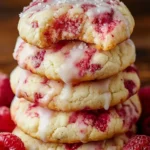
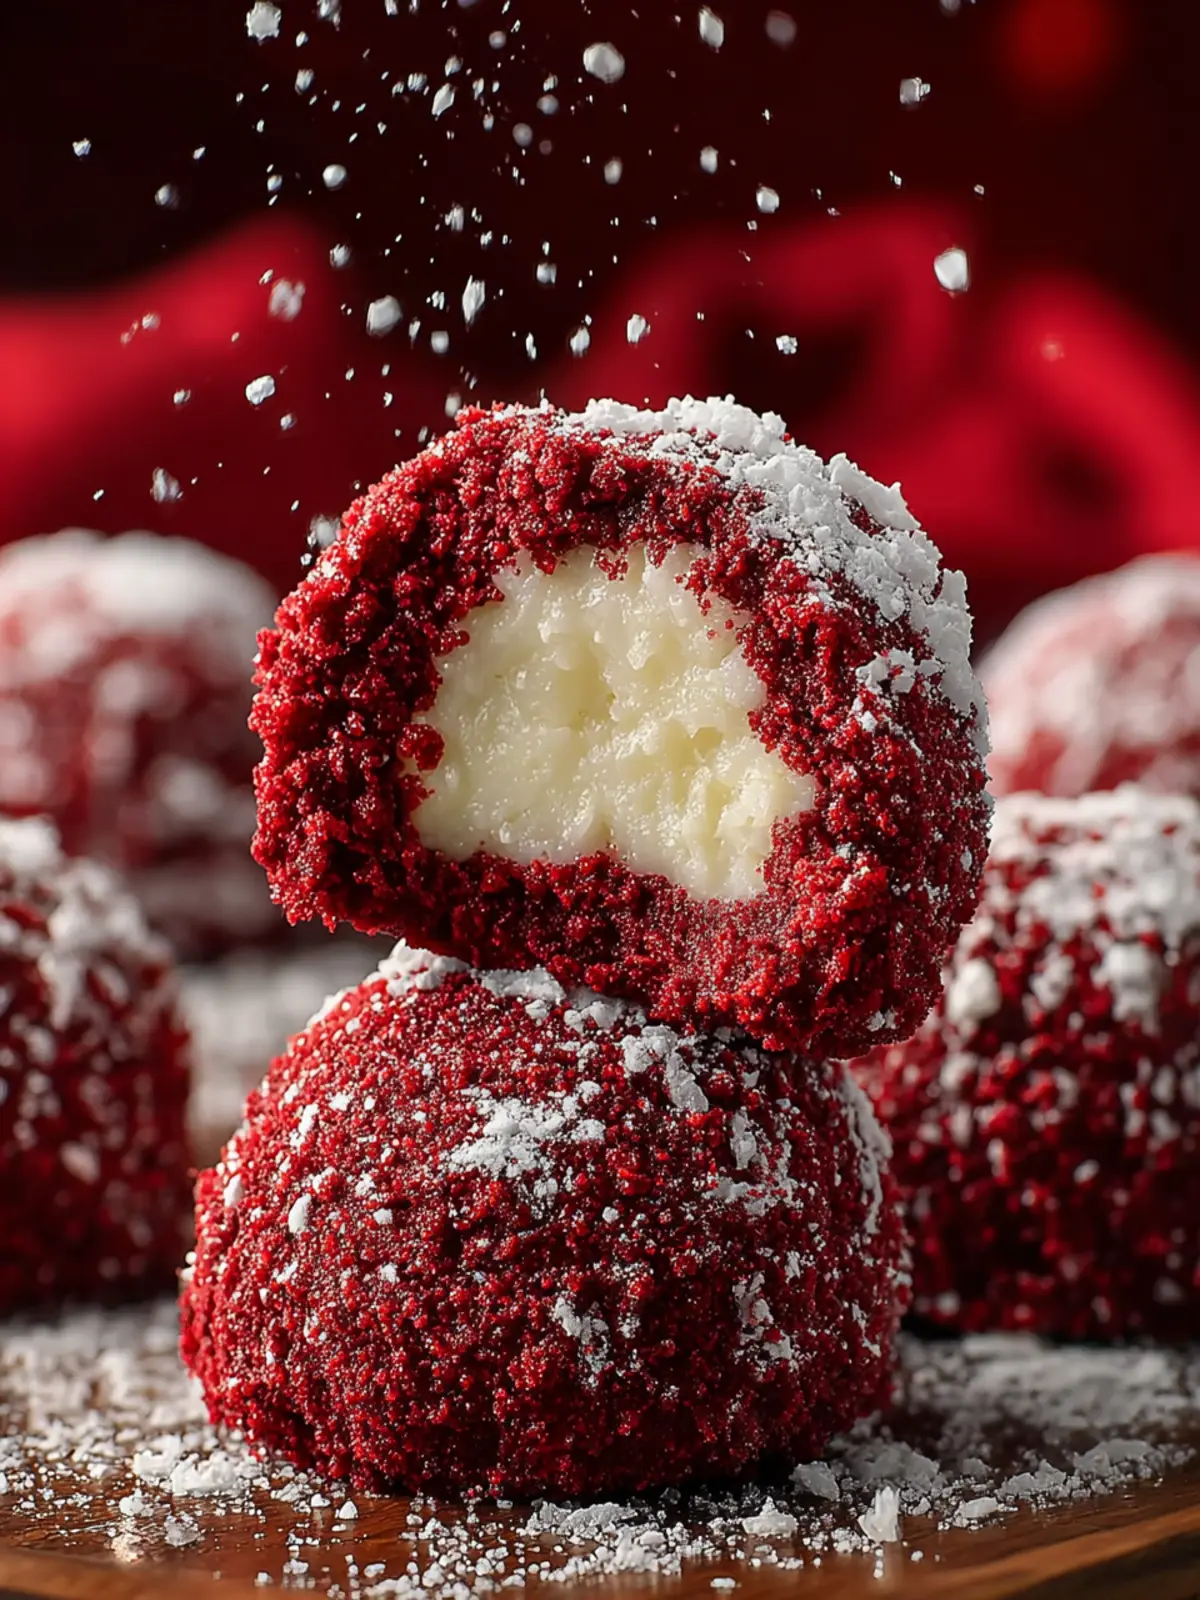
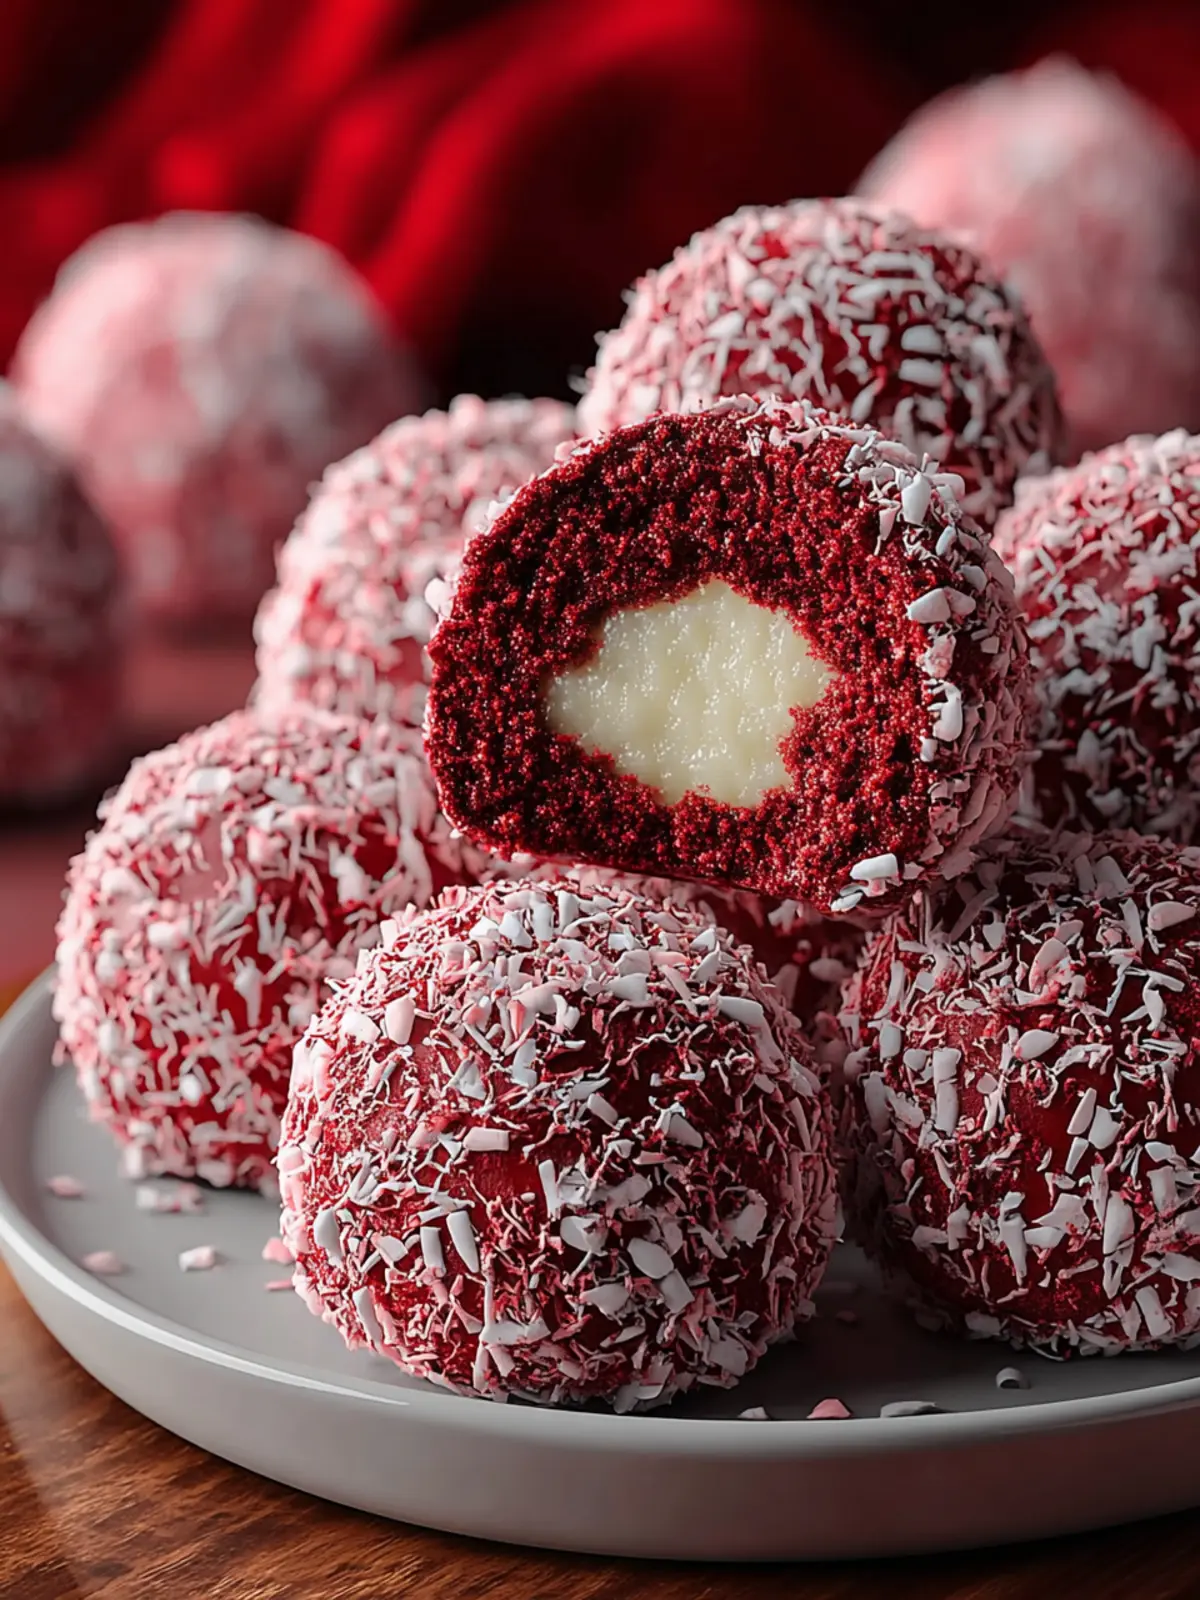
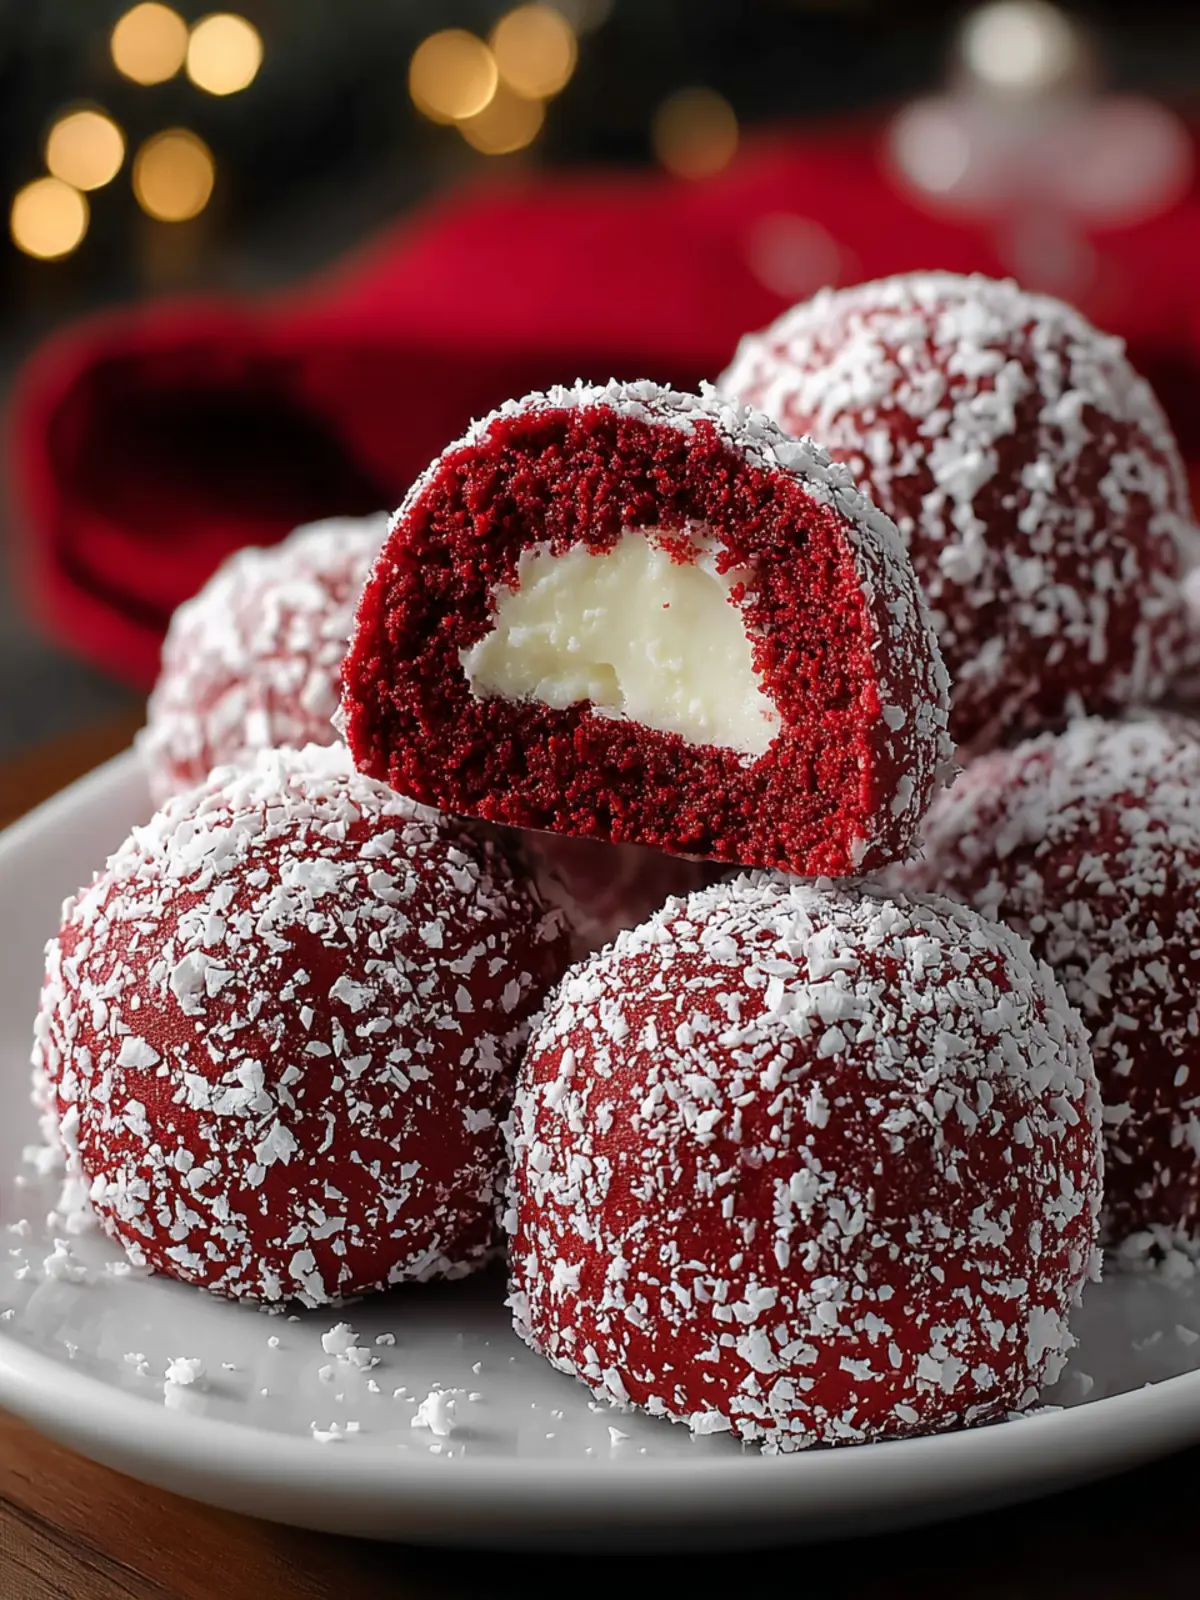
Creating red velvet snowball cookies feels like wrapping your taste buds in a fluffy winter blanket. Imagine biting into a soft, buttery cookie with rich chocolate undertones, all while feeling the satisfying crunch of powdered sugar dusting on top. It brings back memories of cozy holiday gatherings where sweets and laughter filled the air. With a striking red hue, these cookies don’t just taste delicious; they look festive and inviting, adding an extra touch to your dessert table.
What makes red velvet snowball cookies so special? In a world full of cookie varieties, these charming little treats stand out with their unique combination of flavors and textures. The base of the cookie is soft and melt-in-your-mouth tender, thanks to the blend of butter and cocoa, and they’re just sweet enough to be perfectly indulgent without being overwhelming. Each bite delivers a cozy chocolate flavor, but it’s the addition of almond extract that brings out a subtle nuttiness, elevating the cookie’s profile to something truly extraordinary.
The delightful contrasts don’t stop there—each cookie is rolled in powdered sugar, mimicking freshly fallen snow while giving a sweet finishing touch. This duality of texture, from the crumbly exterior to the soft interior, contributes to what makes this cookie a winning choice for any occasion. Whether it’s for a holiday celebration, a casual get-together, or a simple treat for yourself, red velvet snowball cookies fit perfectly in any setting.
Moreover, the vibrant red color symbolizes joy and warmth, making them a favorite for festive occasions. They bring a spirit of cheer and are bound to spark conversations with their playful appearance. So, if you’re ready to whisk up something that’s not only delicious but also visually striking, these cookies might just be the perfect addition to your baking repertoire.
Ready to dive into making your own batch of these delightful treats? Let’s gather our ingredients and get started!
Key Ingredients for Red Velvet Snowball Cookies
Creating red velvet snowball cookies is a delightful journey into the world of baking, where vibrant color meets rich flavor. These cookies bring a festive touch to any holiday gathering or cozy evening at home. Let’s explore the essential ingredients that make these treats so special.
-
Butter: I always opt for unsalted butter, as it allows for better control of the recipe’s overall saltiness. The butter is creamed with sugar to provide a rich foundation that keeps the cookies tender and decadent.
-
Sugar: Granulated sugar provides sweetness and helps the cookies spread beautifully in the oven. Adding a touch of powdered sugar at the end gives the cookies that iconic snowball appearance.
-
All-Purpose Flour: This is essential for structure. I recommend measuring it correctly to ensure you get that perfect cookie texture — soft and slightly chewy.
-
Cocoa Powder: Not only does cocoa powder give the cookies their stunning red velvet hue, but it also imparts a rich chocolate flavor that perfectly complements the sweetness.
-
Eggs: They act as a binder, adding moisture and enriching the cookies. I use large eggs for the best results.
-
Red Food Coloring: For that vibrant red hue, gel food coloring works best, delivering a rich color without adding too much liquid.
-
Chopped Nuts: Pecans add a crunchy texture that balances the soft, tender cookies; they also bring an earthy flavor that enhances the overall taste.
With these key ingredients on hand, you’re well on your way to creating your own batch of red velvet snowball cookies. Happy baking!
Why You’ll Love This Recipe
Creating red velvet snowball cookies is not just about baking; it’s an adventure in flavor and texture that promises to brighten any day. Picture this: a cozy afternoon, the smell of warm, buttery cookies wafting through the air, creating an inviting atmosphere. These cookies not only look gorgeous with their vibrant red hue and snowy powdered sugar coating, but they also deliver a delightful crunch with a soft, melt-in-your-mouth center.
-
Unique Flavor: The subtle chocolate notes mixed with a hint of vanilla make these cookies a treat that stands out among typical holiday snacks.
-
Perfect for Sharing: These cookies are an excellent choice for parties, holiday gatherings, or simply to surprise a friend. Who wouldn’t appreciate a box of these lovely treats?
-
Easy and Fun to Make: With straightforward ingredients and simple steps, you can easily whip up a batch. In just a little over an hour, you’ll have delicious treats that are sure to impress.
-
Great for Any Occasion: Whether it’s a festive celebration or a simple weekend treat, red velvet snowball cookies bring joy and festivity to the table.
Let’s dive into this mouthwatering recipe and see how it’s done!

Variations on Red Velvet Snowball Cookies
Exploring the world of red velvet snowball cookies opens a door to endless flavor combinations that can suit any palate. Think of these cookies as a canvas where you can express your creativity through fun variations.
Nutty Delight
Consider adding chopped nuts to your red velvet snowball cookies for an added crunch. Walnuts or pecans pair beautifully with the rich, chocolatey flavor of the cookies. Toast them lightly before mixing them into the dough to enhance their flavor.
Chocolate Swap
For chocolate lovers, why not incorporate chocolate chips? Replace a portion of the flour with cocoa powder and swirl in some semi-sweet chocolate chips right before baking. The result? A decadent double chocolate experience that takes these cookies to the next level.
Citrus Zing
Do you enjoy a fresh twist? Add a hint of orange or lemon zest to the dough for a burst of citrus flavor. The brightness from the zest balances the richness of the red velvet and creates a delightful flavor profile.
Cream Cheese Surprise
Lastly, consider altering the filling. Instead of rolling your cookies in powdered sugar, try stuffing them with a dollop of cream cheese frosting before baking. You’ll be rewarded with a gooey, indulgent center that complements the snowball’s texture perfectly.
With these variations, your red velvet snowball cookies can transform for any occasion, ensuring there’s something for everyone to enjoy!
Cooking Tips and Notes for Perfect Cookies
Baking red velvet snowball cookies can be a delightful way to sweeten up any occasion; however, achieving that perfect texture and flavor might require a little finesse. Here are some tried-and-true tips to elevate your cookie game:
Use Room Temperature Ingredients
Make sure your butter and eggs are at room temperature prior to mixing. This helps to create a creamier batter that incorporates air more effectively, resulting in cookies that are soft and tender.
Don’t Skip Chilling
After shaping your red velvet snowball cookies, let them chill in the refrigerator for at least 30 minutes. Chilling the dough helps maintain their shape during baking, yielding perfectly round cookies with a delightful bite.
Measure Precisely
Precision in measuring your flour and sugar is crucial. Use the spoon and level method to avoid compacting your flour, which can lead to dry cookies. Consider investing in a kitchen scale for accuracy.
Pay Attention to Baking Time
Every oven is different, so keep a close eye on your cookies as they bake. Pull them out while they’re just set in the center—this ensures a soft, chewy texture once cooled.
Sift Dry Ingredients
Sifting your dry ingredients, especially the cocoa powder and powdered sugar, not only removes lumps but also ensures an even distribution of leavening agents, leading to a better rise and texture in your cookies.
By following these simple yet effective tips, you’ll create red velvet snowball cookies that are irresistibly soft and bursting with flavor. Enjoy the baking process—it’s just as sweet as the final treat!
Serving Suggestions for Red Velvet Snowball Cookies
Crafting red velvet snowball cookies is only the beginning of your culinary adventure. Once they’re baked and cooled, the fun of serving them beautifully can take these delightful treats to the next level. Here are some scrumptious serving ideas to impress your friends and family.
Create a Festive Platter
- Baking with Friends: Arrange your cookies on a vibrant platter with a sprinkle of powdered sugar. Add some festive decorations, like edible sprinkles or themed toppings, to create an eye-catching display.
Pairing Options
- Milk or Coffee: These cookies pair wonderfully with a glass of cold milk or a warm cup of coffee. The chocolatey sweetness complements the rich beverage, making it a perfect afternoon snack.
Gift-Giving
- Thoughtful Treats: Consider packaging your red velvet snowball cookies in a decorative box with a ribbon for a thoughtful homemade gift. They make lovely presents for holidays, birthdays, or just because!
Customization
- Personal Touch: Feel free to customize each batch with different fillings or toppings. Chopped nuts, chocolate chips, or even cream cheese frosting drizzled on top can add unique twists.
By incorporating these serving suggestions, your red velvet snowball cookies will impress anyone who gets to enjoy them. Happy baking!
Time Breakdown for Making Red Velvet Snowball Cookies
Creating those delightful red velvet snowball cookies is a journey of flavor, celebration, and nostalgia. Let’s break down the time involved so you can plan your baking adventure seamlessly.
Preparation Time
Getting everything ready for your red velvet snowball cookies takes about 15 minutes. During this time, you’ll gather your ingredients, mix them together, and roll the dough into delightful balls. It’s a fun and messy process, so don’t hesitate to enjoy it!
Baking Time
Baking your cookies will take around 12-15 minutes. You’ll want to keep an eye on them as they transform from dough to perfectly baked treats, and the smell will make the wait worth it!
Total Time
In total, you’re looking at about 30 minutes from start to finish. That means in less time than it takes to binge-watch an episode of your favorite show, you could have a batch of red velvet snowball cookies ready to impress your friends and family. Happy baking!
Nutritional Facts for Red Velvet Snowball Cookies
When you indulge in the delightful experience of red velvet snowball cookies, it’s helpful to know what you’re feeding your body. These treats are not only festive but also packed with flavor.
Calories
Each cookie contains approximately 120 calories. While this isn’t too high, it’s easy to lose track when those delicious bites keep calling your name!
Fat
These cookies have about 7 grams of fat per serving. The butter provides a rich taste and a tender texture, but be mindful if you’re watching your fat intake.
Sugar
With roughly 8 grams of sugar in each cookie, the sweetness is balanced perfectly with the rich cocoa flavor. Ideal for satisfying your sweet tooth without going overboard!
FAQs about Red Velvet Snowball Cookies
Red Velvet Snowball Cookies are not just a delightful treat; they bring a touch of festive cheer to any gathering! If you’re curious about these charming cookies, you might have a few questions. Let’s clear up any uncertainties you may have.
Can I make these cookies ahead of time?
Absolutely! Preparing your red velvet snowball cookies ahead of time is a great idea, especially if you’re planning for an event. You can bake the cookies and store them in an airtight container for up to a week. Alternatively, you can prepare the dough, roll it into balls, and refrigerate them for up to 48 hours before baking. Just take them out, let them sit at room temperature for about 10 minutes, and then bake.
How should I store Red Velvet Snowball Cookies?
To keep your cookies fresh and delicious, store them in an airtight container at room temperature. A cookie jar works wonders, too! If stored properly, they can last for about a week. To maintain the cookies’ signature texture, avoid stacking them directly on top of one another.
Can I freeze the dough or baked cookies?
Yes! Freezing is an excellent option for both the dough and the baked cookies. If you choose to freeze the dough, shape it into balls, place them on a baking sheet, and freeze until solid. Then, transfer them to a zip-top bag and store them for up to three months. When you’re ready to bake, there’s no need to thaw – just add a couple of extra minutes to the baking time. If freezing baked cookies, lay them flat on a baking sheet until frozen, then transfer to an airtight container. They’ll stay fresh for up to three months in the freezer. Enjoy your baking!
Conclusion on Red Velvet Snowball Cookies
In crafting your red velvet snowball cookies, you’re not just making a dessert; you’re creating a moment, a sweet experience that can be shared with friends and family. Imagine the delight on their faces as they take that first bite, surrounded by the festive color and rich flavor of these cookies. The combination of buttery goodness and the velvety essence of red velvet makes these treats truly special. So, whether you serve them at a holiday gathering or as a delightful afternoon snack, these cookies are sure to brighten your day. Enjoy every crumb and share the love!
Print
Red Velvet Cookies
- Total Time: 27 minutes
- Yield: 24 cookies 1x
- Diet: Vegetarian
Description
Deliciously soft and chewy red velvet cookies rolled in powdered sugar.
Ingredients
Scale
- 2 cups all-purpose flour
- 1/2 cup unsweetened cocoa powder
- 1 cup granulated sugar
- 1/2 cup unsalted butter, softened
- 1 large egg
- 2 tsp red food coloring
- 1 tsp vanilla extract
- Powdered sugar (for rolling)
Instructions
- Preheat your oven to 350°F (175°C) and line a baking sheet with parchment paper.
- In a mixing bowl, cream together softened butter and granulated sugar until light and fluffy (3-4 minutes).
- Beat in the egg, vanilla extract, and red food coloring until well combined.
- In a separate bowl, sift together flour, cocoa powder, and a pinch of salt.
- Gradually add this mixture to the wet ingredients until just combined.
- Roll small portions of dough (about 1 inch in diameter) into balls and place them on the prepared baking sheet.
- Bake for 10-12 minutes or until set.
- Allow cookies to cool slightly before rolling them in powdered sugar.
Notes
- These cookies are great for any festive occasion!
- Make sure to store them in an airtight container to keep them fresh.
- Prep Time: 15 minutes
- Cook Time: 12 minutes
- Category: Dessert
- Method: Baking
- Cuisine: American
Nutrition
- Serving Size: 1 cookie
- Calories: 150
- Sugar: 10g
- Sodium: 50mg
- Fat: 7g
- Saturated Fat: 4g
- Unsaturated Fat: 3g
- Trans Fat: 0g
- Carbohydrates: 20g
- Fiber: 1g
- Protein: 2g
- Cholesterol: 20mg